If you have just read our latest article, you are about to read the sequel in our two-part series on How To Teach Your Child To Ride A Bike.
Remember, we have broken our series into two distinct articles.
In Part 1 – Teaching Your Child to Ride a Balance Bike, we shared our intimate knowledge and expertise with readers on how to teach your child to get rolling on a balance bike. This, we believe, is the ultimate toy to effectively begin their journey into learning how to ride a bike.
In this article, our final in the series, we bring you Part 2 – Teaching Your Child to Ride a Pedal Bike.
Our goal is to complement the knowledge that you have gained from Part 1 and now introduce your little rider onto a pedal bike with some practical tips and ideas that will hopefully see them having a blast as they learn to ride a pedal bike!
The article you’re reading now, Part 2, will be covering the following elements;
- Right Size + Right Fit Pedal Bike

- Walk and Pedal
- Run and Pedal
- Push-Off and Pedal
- Braking and Stopping
- The 3-P’s – Pedal, Practice, and Patience
- Conclusion
We now invite you to sit-back (with your favorite means of hydration of course) and enjoy our final article in our series that completes our journey into helping parents teach their child to ride a bike.
*** Affiliate disclosure time: Some of the links on this page are affiliate links. If you click on those links and make a purchase within a time frame, we earn a small commission. Rest assured, the commission is paid by the retailers, not by you.
This commission helps keep ilovetoridemybike.com riding and writing. We thank you for your generous support. You are helping us continue doing what we love and that’s providing our customers with all the information they need to know about kids balance bikes.
Part 2 – Teaching Your Child to Ride a Pedal Bike
Teaching and learning to ride a bike is a special occasion for a family, one that we hope will create wonderful, lifelong memories for you and your child.
In addition, learning to ride a bike should be absolutely fun! Yes, for parents as well as kids.
To help make this experience not only rewarding, but also super-fun and enjoyable, we want to top-up your toolkit of bike knowledge with a step-by-step guide to follow.
So, let’s get riding!
Right Size + Right Fit Pedal Bike
We have already covered some great ground into how to find the right size balance bike and, how to correctly adjust this so that it fits your child perfectly.
If you haven’t already, head on over to our post Balance Bike Buyers Guide as this provides you with a step-by-step guide to help you match the right bike and the right fit to your riding champion.
The great news is, you can apply this same knowledge when looking to purchase a pedal bike, with just one small adjustment.
Raise the seat height just a little.
Basically, you still want your child to be able to walk and run while sitting in the seat, just like they are used to doing on their balance bike, but they can now have a slightly raised heel that allows for the front-half of their feet to be touching the ground.
A pedal bike requires a slightly higher seat-height than a balance bike!

When necessary, this will comfortably allow them to touch-down and balance, use their feet to power their initial take off (we will get into this more in the sections below – Walk and Pedal and Run and Pedal) and of course have the added reassurance of using their feet to gently slow-down or stop.
Importantly, this slightly higher seat facilitates a more powerful, smooth pedal stroke for your little rider.
As they progress, the seat-height can be raised again to an optimal position. When in a stationary position, this optimal position, allows the child to be sitting in their seat with just their toes touching the ground.
Walk and Pedal
OK, so you have the right size pedal bike and have correctly adjusted the seat height to fit your little rider.
Next, let’s get pedaling!
You will find kids will again use their intuition here, but we recommend that parents follow our 4-Steps to Learning Model that we introduced in Part 1 of our series.
If you missed it, or simply would like a refresher, we have outlined this again for you below.
Our 4-Steps to Learning Model
- Explain the skill and why it’s important
- Demonstrate the skill through modeling
- Check understanding by asking and encouraging questions, and
- Allow child to go and practice / explore the skill on their own
You can use this model in each of the progressions mentioned below.
Give it a go!
Once again, we thought it might be helpful to provide a practical example of what this might look like for parents, out there in the right learning environment.
- Explain by having a discussion with your little rider along the lines of; “you know when you’re walking and gliding along on your bike, you can now place your feet on the pedals and start pedaling once you have gained enough speed to keep your balance”!
- You can reassure them that “The pedals will keep your speed up rather than using your feet on the ground”
- “Just keep pedaling gently, no need to rush, while keeping your head up and a firm grip on your steering”
- At this point, you can tell them to use their feet to slow down and stop. We will discuss using brakes a little later
- Demonstrate exactly what you would like them to do on a bike so they can interpret this skill visually, while giving an explanation of what you’re doing.
- Ride past them a few times beginning by walking, gaining speed and then begin to gently pedal and finally, use your feet to slow down and stop.
- Check for understanding. Ask and encourage questions. This might include “what do you do before we place our feet on the pedals?” Or “what do you do when you would like to slow down and stop?”
- Allow them to practice and explore. As always with your support, encourage them to get out there and have a go!

We think that you will be amazed at how quickly they will begin to pedal instinctively.
Right now, how long they pedal for, how slowly they pedal or what this looks like, simply doesn’t matter.
It’s all about fun and enjoying this exciting new adventure together.
For those children with balance bike experience, this transition could be relatively quick and easy.
For those who have begun to learn to ride a bike without prior balance bike experience, this can take some time. But they will get there in their own time.
Two special points are worth mentioning here before we move on.
- If their bike has a coaster brake (an internal brake that is engaged by moving the pedals backwards) make sure they are aware that this will slow them down. Reinforce that at this stage, we just want to practice pedaling forward.
- Your little riding champion may be really struggling with beginning to gain momentum (walking) and pedaling. If this gets to a point when this is no longer fun, don’t hesitate to bin the lesson plan, and simply let them ride their bike as a balance bike or get back onto their balance bike if they have one.
There is no rush with their learning to ride a bike. Make sure they are aware of this and allow them to try again when they are ready.
Run and Pedal
If they have done well in the walk to pedal progression, you can mention that their balance is more stable when they have a little more speed.
Now we want to encourage them to run along first, just like they would do on their balance bikes, and then place their feet on the pedals to begin pedaling forward.
Give them a reminder to keep looking forward, keep a firm grip on their steering and to use their feet to gradually slow down and stop when needed (or use their coaster brake if they have one).
Have them practice this run to pedal start several times while riding a circuit. Even have them try to gradually come to a stop right beside you, or on a line or marker cone. Keep this super fun and enjoyable as they practice.
Push-off and Pedal
The next progression is to teach your child how to start from the ready position.
This ready position has one pedal slightly forward from the very top, or around 2 o’clock.
Following the 4-steps to learning model, teach them to start from a stationary position on their bikes, with the pedals at the ready position (preferred foot at the top). Ask them to drive forward on the pedal and as they begin to move forward, place both feet onto the pedals.
Your riding baby!
You will know when it’s time to introduce this step into their bike riding journey. Basically, when you can see that they have mastered gaining momentum from walking/running and are riding away on the pedals confidently, absolutely have them give this final transition to pedaling a go.
Braking and Stopping
This is such an important aspect in learning how to ride a bike, but one that is easily overlooked. So, we want to bring this essential skill into your bike coaching manual and provide you with some concrete tips.
If your child has learnt to ride a balance bike, they will already be well advanced in using their feet to slow them down and stop. We always encourage these skills to be developed first, before introducing the hand brake (or coaster brake) skills.
This allows your child to have the added reassurance that they can instinctively slow down at any time, keeping their riding speeds appropriate to the environment.
Next, let’s introduce the handbrake and/or coaster brake.
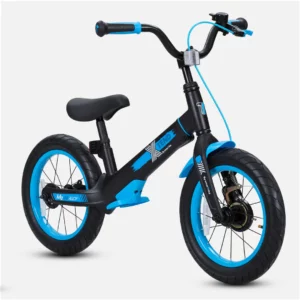
![]()
smarTrike 3-in-1 Xtend – An example of a bike with a handbrake!
An example of a bike with a coaster brake!

We again encourage you to follow our 4-steps to learning model outlined above. Here are some important insights and tips that you can incorporate into their learning.
- Explain and demonstrate how both of these braking mechanisms work.
- Always encourage gentle braking, both with their feet (coaster brake) and a gentle two-finger squeeze when using the handbrake
- explain and show them what happens when you brake too quickly. This will help to reinforce the gentle braking strategy
- have your little rider experiment using the brakes when stationary first, then while walking and finally when riding slowly and at faster speeds (progression)
- allow for opportunities to practice using the brake, reinforcing the two-finger squeeze technique and the gentle braking strategy
Be creative in thinking of some fun games in the learning environment that can provide great opportunities for your child to practice using their brakes.
Like any skill, the more opportunities and unique variations that keeps them in the learning zone (ZPD), the quicker they will become proficient and confident in using this super-important skill in their bike riding.
The 3-P’s – Pedal, Practice and Patience
The 3-P’s derive their motivation from a wonderful attribute for anybody to practice.
Encouragement!
You have and are doing a wonderful job in teaching your child how to ride a bike. As your little riding champion progresses, we ask that you reinforce the following as they continue to learn.
Encourage Pedaling

By reminding them that that their bikes now have pedal power, encourage them to use this to keep moving forward.
It might take some time for riders to stop using their feet to run along but as a general rule, once they experience the motion of movement by the power of their own little legs, this will be enough to motivate them to keep trying.
Encourage Practice
Provide opportunities for them to get out there and ride.
By keeping their learning experiences fun, getting out into the right riding environments that are safe and interesting, and using this as an opportunity to spend some quality time with your child is a great way to share in the learning experience. And lastly,
Encourage Patience
There is no better way to encourage a behavior than to model this ourselves. By being patient with your child’s progress and learning, whatever this may look like, pours volumes of good love into your child’s love tank.
A patient spirit guides and supports, is gentle and affirming and is the key to not only great success in teaching your child to ride a bike, but in any interaction that you have with your child. By modeling this virtue, ask your child to also be patient as they have a ball learning how to ride their bike.
Conclusion
Wow, we have covered a lot of ground together in our two-part series, How To Teach Your Child To Ride a Bike.
Remember, we have broken this down into two distinct parts as we believe the progression provided by learning firstly, how to ride a balance bike and then, how to ride a pedal bike is the way to go when teaching your child to ride a bike.
We hope that you have found our article helpful, leaving you feeling more confident in your ability to teach and support your child in this wonderful lifelong skill.
You’ve got this, and so has your little rider!
If you have any further question or comments, please leave these below. We would love to hear about your experiences with this subject or anything to do with bikes more broadly.
Best of luck!
Kids all love to be outside riding bikes, but many find it a bit daunting to start with. While they are still learning to balance, they might be worried about falling over, or not being able to stop when needed. These tips and tricks to help one to teach your child to ride, is very helpful and will make it easier to give kids confidence when learning how to ride a bike.
Do you have specific tips for kids that didn’t have a balance bike to start with first? Is it advisable to have balance wheels to help them, or rather not? Thank you.
Hi. thank you for your comments and questions. We hope that you found this helpful.
Great question!
For kids that didn’t begin learning to ride on a balance bike, they may need, at times a gentle hand in the back to help give them a push to build momentum, leading into beginning to pedal.
Another option is the Balance Buddy trainer. These have a long, supportive pole that is attached to the rear wheel and extend up to around adult waist height. The adult can then keep a hand on this, helping to provide stability if needed. The downside is the parent needs to get moving with their child (either walking or running).
We don’t recommend using training wheels, but if needed, simply going back to the balance bike for a while to build confidence before attempting a pedal bike again. We hope that this helps you!
Thank you again for following. Please ask if you have any further questions. Happy riding!